
The Zenmuse L1 is the first Lidar payload developed by DJI, integrating a Livox Lidar module, a high-accuracy IMU and a camera with a 1-inch CMOS on a 3-axis stabilized gimbal. The L1 delivers enhanced 3D data capture capability with a detection range of up to 450m, enabling the acquisition of up to 2 square kilometers of point cloud data in a single flight. It offers point cloud data capture with exceptional centimeter-level accuracy thanks to the high-precision IMU, vision sensor for positioning accuracy, plus GNSS data.
This integrated Lidar system offers significant benefits for challenging forest inventory that a surveyor would normally need to walk through. There is no longer the need to continually move the physical station and struggle to rely on GPS, which is less effective in heavy foliage. The utility of the L1’s Lidar capability in capturing accurate data despite dense vegetation, a clear advantage over conventional photogrammetric methods.
Terrasolid has developed advanced tools for LiDAR point clouds produced with DJI L1.
Let us see the processing steps for LiDAR point clouds produced with DJI L1.
Steps cover:
- Import of point cloud and trajectory solution
- Removing redundant data
- Smoothing point cloud
- Classifying ground hits
- Classifying hits on trees, vegetation, and building roofs
- Adjusting data elevation to ground control points
- Producing contours as an example of possible end products
Drone Processing Wizard
- Tools simplifying DJI L1 data import and processing
- One step import dialog
- Tool for running normal processing steps using one guided dialog
- May add support for other drone systems later on
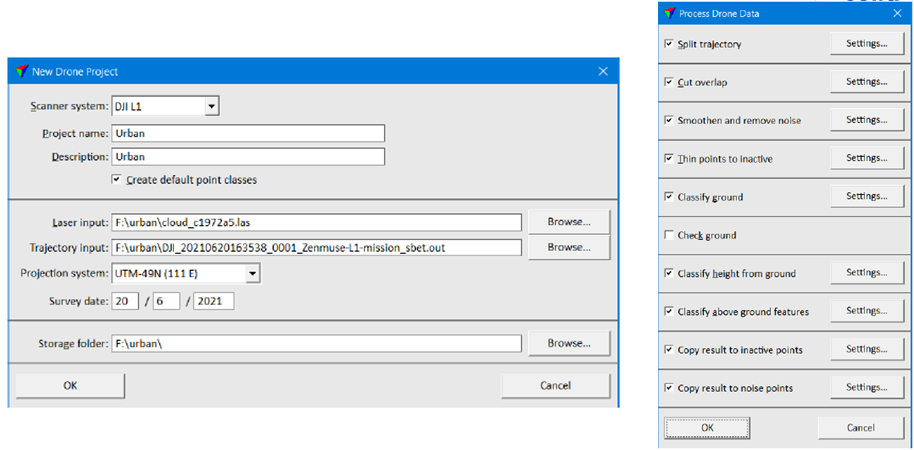
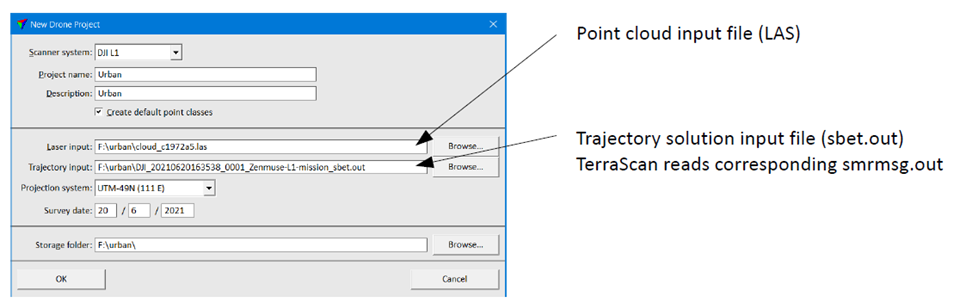
Drone Processing Wizard – Input Data
- DJI Terra writes:
- Point cloud as LAS file
- Trajectory solution as xxxxxxxx_sbet.out
- Trajectory accuracy estimates as xxxxxx_smrmsg.out
Drone Processing Wizard & End Products
- Processing wizard performs typical processing steps which are common for many end products
- You run all or some of the wizard steps
- You may then continue with end product steps:
- Dedicated tools for powerline processing (vectorize wires, find danger trees, …)
- City modeling (building vectorization, texturing with TerraPhoto, …)
- Contour production (classify contour keypoints, display contours)
- Volume computation (classify model keypoints, create TIN models, compute volumes)
Drone Processing Wizard
- You can decide if you run all automatic steps in one go
- Or you can choose to run steps and then check the result before proceeding
- You can always use TerraScan tools to manipulate data at any point
- Classify bad data out at the start or later on
- Remove unnecessary data at any point
- Perform some Wizard step with different logic if you are not happy with the result
Default Point Classes 
- You can use your own list of classes or let New drone project create default classes
- Don’t change classes 1-8 – those are industry standard
- You may choose your own definition for class 9 and higher
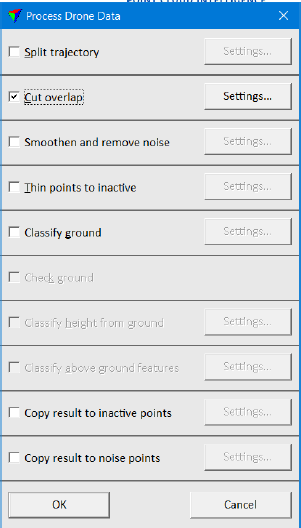
Split Trajectory
- Split trajectories so that each flight pass over collection area becomes its own trajectory
- Remove short transition segments and delete corresponding laser points

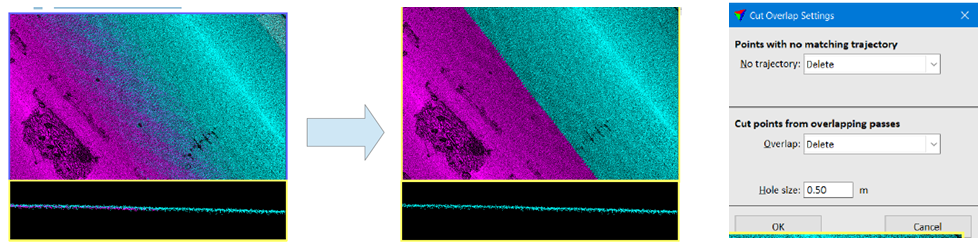
Cut Overlap
- Remove overlapping data so that each xy location has points from one pass only
- This:
- Improves accuracy as we remove points with biggest positional issues
- Simplifies data as we always have just one image of reality
- Reduces data volume
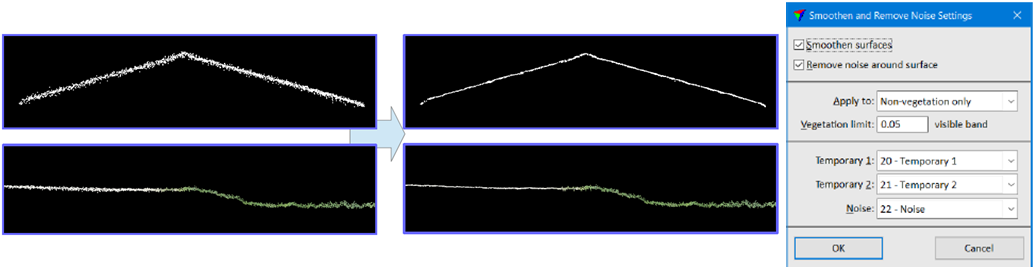
Smoothen and Remove Noise
- Smoothens surfaces and classifies outliers as noise – eliminates point-to-point noise and makes surfaces prettier
- Can use point color information to recognize vegetation and apply smoothing only to non-vegetation surfaces
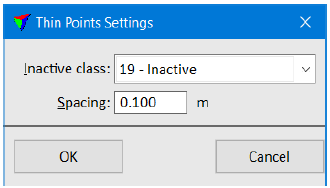
Thin Points to Inactive
- Optional step for speeding up processing
- Applies thinning and classifies many of the points as inactive
- We run classification steps only on active points
- At the end we copy above ground feature classification to inactive points from closest actively classified point
Classify Ground
- Ground classification removes some outliers and runs ground classification
- Result is mostly good but some editing is often needed:
- Bridges typically become ground
- Ground may have some low points

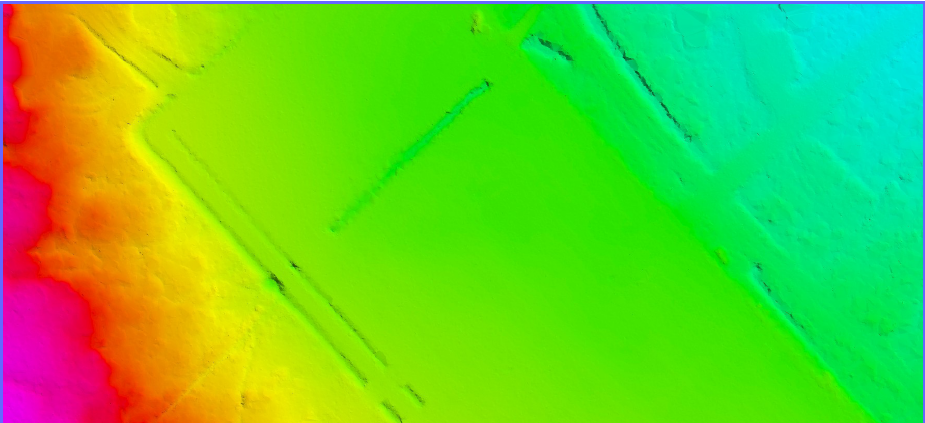
Check Ground
- Visualize ground as shaded TIN surface or as contours
- Use manual classification tools to classify points out or into the ground
- Updates visualization automatically
- If terrain is easy, you can do this at the end
- If terrain is difficult, you should do this before classifying above ground
Classify Height from Ground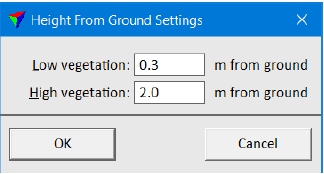
- Classifies points to (user can change limits):
- 3 – Low vegetation less than 0.3m above ground
- 4 – Medium vegetation 0.3 – 2.0m above ground
- 5 – High vegetation more than 2.0m above ground
- We have low vegetation everywhere so it does not have much active use
- We classify medium and high vegetation further to Car, Tree, Vegetation, Building roof, …

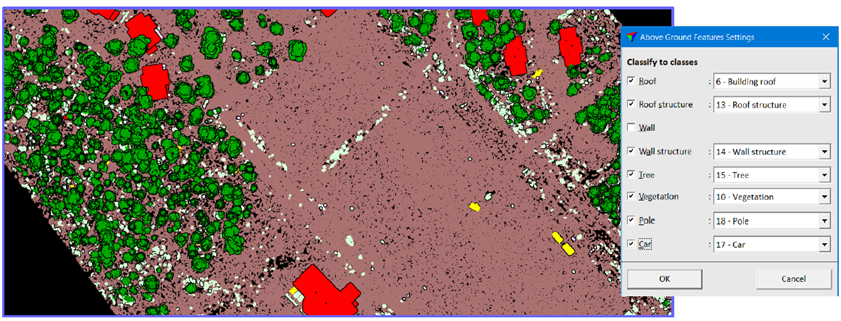
Classify Above Ground Features
- Runs grouping (=segmentation) of medium and high vegetation points
- Classifies groups using best match principle to 8 possible different classes
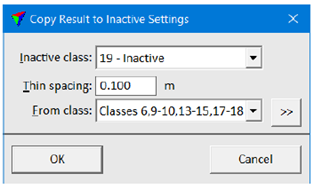
Copy Result to Inactive Points
- Copies above ground feature classification (Building roof, Vegetation, Tree, Pole, …) to points
classified earlier as inactive for speeding up the process
- Needed only if Thin Points to Inactive step was done to speed up the process
Copy Result to Noise Points
- Copies vegetation classification (Vegetation and Tree) to points classified earlier as noise
- Needed only if noise was classified in Smoothen and Remove Noise step
- Noise points close to hard surface should remain in Noise class
- Vegetation itself is noisy – no reason to discard any points
